What is Thalipeeth?
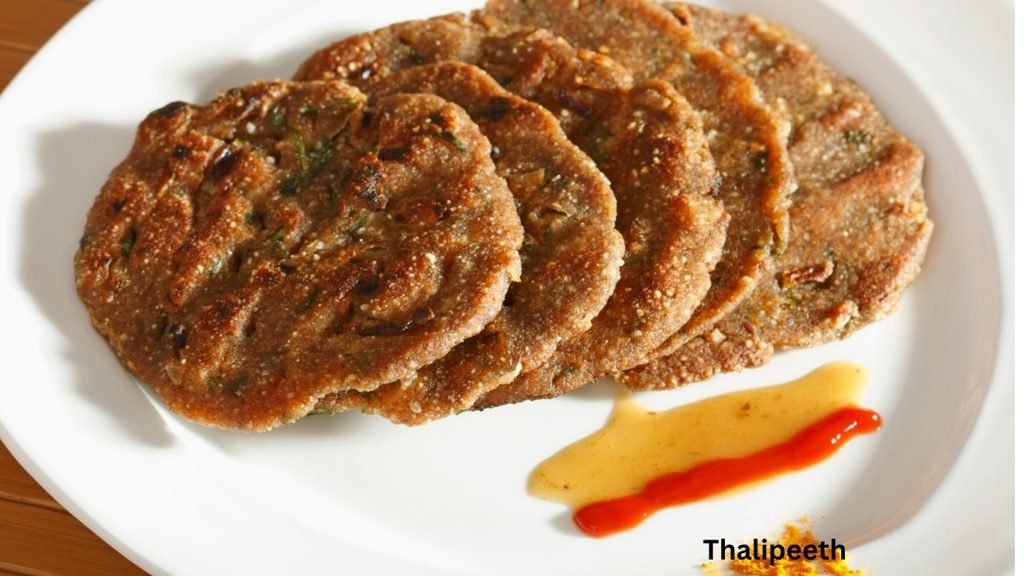
Thalipeeth is a savory. It’s a multigrain flatbread from Maharashtra made by combining a special roasted flour blend called “bhajani”. It’s typically made from jowar, bajra, rice, chana dal and urad dal, with chopped onions, green chilies, coriander and spices. The dough is patted directly onto a hot griddle by hand rather than rolled with a pin which gives it a distinctively rustic, slightly thick and textured shape. There are holes poked into the center to help it cook evenly. It’s shallow-fried with oil or ghee until golden and crisp on the outside while staying soft within.
Where Thalipeeth Comes From?
Thalipeeth has deep roots in Maharashtrian home cooking, where the bhajani flour blend was traditionally prepared in bulk at home, roasted and stored for months so a nutritious breakfast was always just minutes away. It’s especially popular in rural Maharashtra and among farming communities, where the mix of lentils and grains provided sustained energy for long working mornings. Today it remains a beloved everyday breakfast and evening snack across Maharashtra, often served alongside curd, pickle, or a dollop of homemade butter.
Health Benefits of Multigrain Bhajani Flour
- Combining jowar, bajra, and lentils gives thalipeeth a much higher protein and fiber content than a plain wheat or rice breakfast
- Jowar and bajra are gluten-free millets that are slow to digest, helping keep blood sugar levels steady through the morning
- The lentils in the bhajani mix add plant-based protein and iron, making this a genuinely filling, sustaining breakfast
- Onions and green chilies add antioxidants and Vitamin C, while the mix of grains provides B-vitamins and minerals like magnesium
Ingredients:
- 2 cups thalipeeth bhajani flour (multigrain flour blend)
- 1 medium onion, finely chopped
- 2 green chilies, finely chopped
- 2 tablespoons chopped coriander leaves
- 1/2 teaspoon cumin seeds
- 1/2 teaspoon turmeric powder
- 1/2 teaspoon red chili powder
- A pinch of asafoetida
- Salt to taste
- Warm water, as needed to bind the dough
- Oil or ghee, for shallow frying
Instructions:
Step 1: Make the dough
In a large bowl, combine the bhajani flour, chopped onion, green chilies, coriander leaves, cumin seeds, turmeric, red chili powder, asafoetida, and salt. Mix well with your hands.
Step 2: Knead with warm water
Gradually add warm water and knead into a soft, pliable dough, similar to roti dough but slightly softer. Cover and rest for 10 minutes.
Step 3: Shape the thalipeeth
Take a portion of dough and place it on a piece of greased parchment paper or a plastic sheet. Pat it out gently with your fingers into a flat disc about 1/4 inch thick, directly on the sheet — no rolling pin needed.
Step 4: Poke holes
Using your finger or the back of a spoon, poke 4-5 small holes in the center and around the disc. These help the thalipeeth cook evenly and let steam escape.
Step 5: Cook on the griddle
Heat a tava or griddle on medium heat. Carefully flip the shaped thalipeeth onto the hot tava. Drizzle oil or ghee around the edges and into the holes.
Step 6: Cook both sides
Cook for 3-4 minutes until the bottom turns golden and crisp, then flip and cook the other side similarly, pressing gently with a spatula for even cooking.
Step 7: Serve hot
Remove from the tava once both sides are golden brown with a few crisp spots. Serve immediately while hot.
Tips:
Keep the dough slightly soft, as a stiff dough makes it harder to pat out and can result in a dense thalipeeth. If patting directly with your hands feels tricky at first, use a greased plastic sheet or banana leaf to shape it, then flip it onto the tava. Don’t skip the holes — they’re essential for even cooking and that signature textured look.
Preparation Time
Prep: 15 minutes | Cook: 20 minutes | Total: 35 minutes | Serves: 4 (makes 6-7 thalipeeth)
Common Mistakes
- Making the dough too stiff, which makes patting it out difficult and results in a dense, hard thalipeeth
- Cooking on too high heat, which browns the outside before the inside cooks through
- Forgetting to poke holes, leading to uneven cooking and a raw center
Substitutions
You can buy ready-made bhajani flour from an Indian grocery store, or make your own blend using roasted jowar, bajra, rice, chana dal, and urad dal ground together. No bhajani on hand? A mix of whole wheat flour, besan, and a little rice flour makes a decent everyday substitute, though the flavor will be milder. Grated bottle gourd or carrot can be added to the dough for extra nutrition and moisture.
Storage and Reheating
Thalipeeth is best enjoyed fresh and hot off the tava, but leftover ones can be refrigerated in an airtight container for up to 2 days. Reheat on a hot tava with a little oil to bring back the crispness — microwaving will make it soft and chewy instead. The raw dough itself does not store well, so it’s best to shape and cook it the same day.
What to Serve With It
Thalipeeth is traditionally served with a dollop of fresh white butter or ghee, along with plain curd, pickle, or a green chutney. It also pairs well with a cup of hot masala chai for a complete, satisfying breakfast.
Frequently Asked Questions
Can I make thalipeeth without bhajani flour?
Yes, though the flavor and texture will differ. A mix of jowar flour, bajra flour, and besan is a reasonable substitute if you can’t find the traditional blend.
Why is my thalipeeth breaking while flipping?
This usually happens if the dough is too dry or the disc is patted too thin. Keep the dough soft and slightly thicker for a sturdier flatbread.
Is thalipeeth gluten-free?
Yes, when made with a traditional bhajani blend of jowar, bajra, rice, and lentils, thalipeeth is naturally gluten-free.
Nutrition Information (approximate, per piece)
Calories: 180 | Protein: 5g | Carbohydrates: 26g | Fat: 6g | Fiber: 4g
For more such quick recipes, visit my YouTube channel qwikrecipes. If you like the recipe, do like, comment and subscribe.